This page presents how to use Cohorte to construct a distributed component-based service-oriented application.
You should have been already downloaded and installed Cohorte on your system (more details here).
The components are implemented on Python, you should have Python installed on your system (2.7+). Notice that Cohorte also supports Java component-based service-oriented components provided by Apache Felix iPOJO.
Type the following command to ensure that Cohorte is properly installed on your system:
$ cohorte-version

-----------------[ Installed COHORTE distribution ]--------------------

    - distribution : cohorte-macosx-distribution
    - version      : 1.1.0
    - stage        : dev
    - timestamp    : 20150701-233214
    - location     : /Users/debbabi/tools/cohorte

-----------------------------------------------------------------------
A simple distributed application
In this getting started tutorial, we will create a simple application consisting of two components deployed on two different nodes.
We have one component Sensor providing a Temperature Service and another component Viewer consuming this service to show the current temperature on a Web page.

In Cohorte, developers concentrate on the architecture of the application, not deployment constraints. Here we have a simple service-oriented application composed of two components which will be deployed on different (distributed) nodes. Developers have not to worry about this details.
Creating Cohorte Nodes
We start first by creating Cohorte Nodes that will host the different application components. Cohorte Nodes could be executed on the same physical machine or on different machines. Cohorte supports two protocols for the abstraction of the discovery and communication between nodes: http and xmpp. Depending on the deployment strategy, you can choose one and/or the two protocols. Http is used on local network areas, while xmpp is prefered to be used for Internet based applications (you need an XMPP server).
To create the two nodes, type the following commands :
$ cohorte-create-node -n node1 -c myapp$ cohorte-create-node -n node2 Each of this commands will create a directory containing two sub-directories repo and conf and two executables run and run.bat for unix-based and Windows operating systems.
Option -n gives a name for the node, while the -c option provides a name for the composition (application). It is set only on node1 as we have to write the composition of the application in only one place (Top Composer node).
On each node, there is a generated conf/run.js file which provides default startup options (more information on startup options here).
Writting the Composition specification
On node1/conf directory, update composition.js to provide the composition of the application (set of components and their placement).
{
    "name": "myapp",
    "root": {
        "name": "myapp-composition",
        "components": [
            {
                "name"    : "Viewer",
                "factory" : "org.example.temperature.Viewer",
                "node"    : "node1"
            },
            {
                "name"    : "Sensor",
                "factory" : "org.example.temperature.Sensor",
                "node"    : "node2"
            }
        ]
    }
}
We will have two component instances named Viewer and Sensor located on node1 and node2 respectively.
Each component insance will be created using a Factory (or Component Factory), which is no more than a simple Classes providing and consuming services.
Implementing Service-Oriented Components
To implement the two Component Factories org.example.temperature.Viewer and org.example.temperature.Sensor we have the choice between :
- Python : using Coderxpress iPOPO framework.
- Java : using Apache Felix iPOJO framework.
In this getting started example, we will use Python programming language. See this page for more details about the supported component-based service-oriented frameworks.
- Create a directory
temperature, and create on it three other files :

sensor.py implements org.example.temperature.Sensor Component Factory. It has the following content :
from pelix.ipopo.decorators import ComponentFactory, Provides
import random

@ComponentFactory("org.example.temperature.Sensor")
@Provides("TemperatureService")
class Sensor(object):

    def get_temperature(self):
        return randrange(0, 50)
This component implements TemperatureService service which has one method get_temperature() that returns, for simplicity, a random number between 0 and 50.
viewer.py implements org.example.temperature.Viewer Component Factory. It has the following content :
from pelix.ipopo.decorators import ComponentFactory, Provides, Requires, Property
import pelix.remote

@ComponentFactory("org.example.temperature.Viewer")
@Provides('pelix.http.servlet')
@Property('path', 'pelix.http.path', "/")
@Property('reject', pelix.remote.PROP_EXPORT_REJECT, ['pelix.http.servlet'])
@Requires("sensor","TemperatureService")
class Viewer(object):
    def __init__(self):
        sensor = None
        path = None

    def do_GET(self, request, response):
        temp = self.sensor.get_temperature()
        result = "<H3>Actual Temperature : {0}</h3>".format(temp)
        response.send_content(200, result, "text/html")
This component requires TemperatureService to get sensor’s captured temperature. It also provides (implements) the pelix.http.servlet which is a standard service provided by the runtime to publish webpages (or servlets). The servlet is binded with the path /. The port on which the servlet will be listening for requests is could be configured or left to Cohorte’s runtime to affect a random one.
One detail to mention here is the use of reject service property to avoid exporting the listed provided services as Remote Services. That is, the pelix.http.servlet is local service, we should not export it as remote service. All other service are by default exported as Remote Services.
Starting the Nodes
Put temperature directory containing the implemented components on the repo directory of each of the two nodes (node1/repo and repo2/repo).
node1 has composition.js on its conf directory, we will start it as a Top Composer (responsible for distributing the composition specification to all other nodes).
Go to node1 directory and type the following command :
$ ./run --app-id myappid --top-composer true --http-port 9000--app-id option is mandatory and sets the application’s identifier that is shared between all the nodes of the application.
--http-port sets the port on which we can access the HTTP Service (servlets) of this node.
You should see an output that looks like that :
   _____ ____  _    _  ____  _____ _______ ______
  / ____/ __ \| |  | |/ __ \|  __ \__   __|  ____|
 | |   | |  | | |__| | |  | | |__) | | |  | |__
 | |   | |  | |  __  | |  | |  _  /  | |  |  __|
 | |___| |__| | |  | | |__| | | \ \  | |  | |____
  \_____\____/|_|  |_|\____/|_|  \_\ |_|  |______|


     APPLICATION ID : myappid
          NODE NAME : node1
         TRANSPORTS : http

       TOP COMPOSER : True

          HTTP PORT : 0
         SHELL PORT : 0

   COMPOSITION FILE : composition.js
         AUTO START : True
Start the second node by going to node2 directory and typing the following command (without the --top-composer option, by default is false):
$ ./run --app-id myappid Monitoring the different nodes
Open a web browser with the following address : http://localhost:9000/webadmin
This will open the webadmin application provided by Cohorte’s runtime. It allows you monitoring all the nodes of the application in one place.

You notice that we have two nodes (we can re-deploy them on two different machines). On each node, we have the desired component instances that runs on python Isolates.
- Click on
node1-python-auto01to get detailed information. Figure out HTTP-PORT property to get its concret http port on which the HTTP service is accessible.
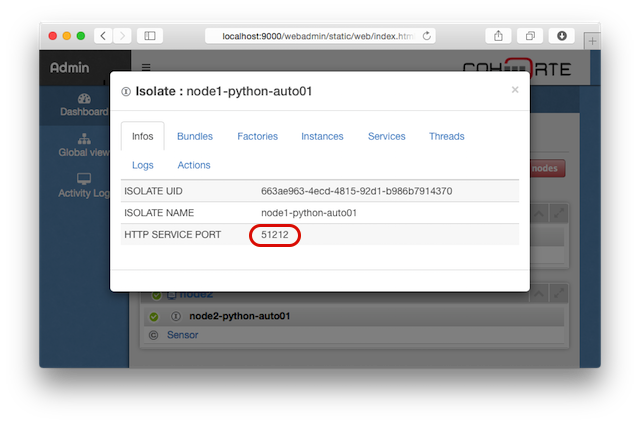
- Open a new browser and type the following address :
http://localhost:51212where51212is the actual Http Port of the container (isolat) of theViewercomponent instance.
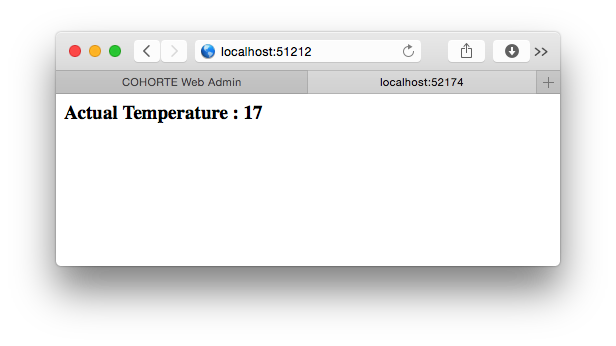
- Refresh the webpage to see different values returned by the
TemperatureServiceimplemented bySensorcomponent and consumed byViewercomponent.
Tutorial material
Download this tutorial material from here
comments powered by Disqus