As a COHORTE user, you need to have Java ( >= 1.6 ) and Python ( >= 3 ) installed on your system. Next, you need to download and install COHORTE on your system.
The objective of this getting started tutorial is to get you familiar with COHORTE concepts as quickly as possible. There is no need to start coding at this step. You find other advanced tutorials in the tutorials section of the documentation page.
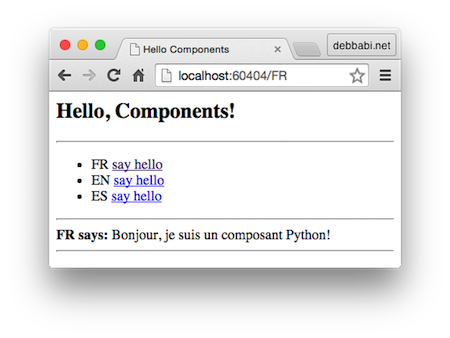
The following picture depicts the architecture of the to be developed application. It consists of one component HelloComponents which requires a set of other components providing HELLO SERVICE (HelloFrench, HelloEnglish, etc). HelloComponents component provides a web page that shows the list of available HELLO SERVICE providers and allows users to invoke their say_hello() and shows the returned message on the web page.
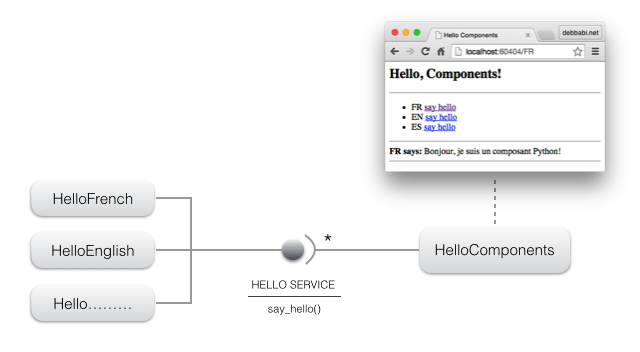
Hello components (implementing the HELLO SERVICE) can be implemented using different programming languages (Java and/or Python) and can be placed in different remote nodes. Developers have not to worry about this details. COHORTE manages to have all the application components interacts as they where in one place (Using Remote Services).
The remainder of this tutorial is organized in four steps :
- STEP 1 : creating a simple application on one node, but two seperate isolates.
- STEP 2 : using two distributed nodes to host the same application (without changing the components implementation code).
- STEP 3 : using a mixture of Java and Python components.
- STEP 4 : crash-test
Creating a simple application (one node)
In this first step of the tutorial, we will instantiate the components HelloComponents (HC), HelloEnglish (EN), HelloFrench (FR), and HelloSpanish (ES). We want to seperate between HC component and other components providing HELLO SERVICE (which can contain third-party non controlled code). COHORTE supports this separation by using Isolates. Isolates are a seperate process with all the needed runtime infrastructure allowing the execution of the managed components.
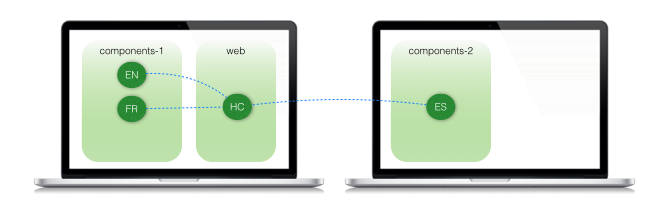
The following picture depicts the desired resilient architecture. If one of the components providing the HELLO SERVICE fails, there will be no impact on HC component! As they are deployed on two seperate containers or isolates (web and components-1).

Preparing the execution node
- Open a new terminal and type the following command on your working directory (check this page for more detail about creating and starting Cohorte Nodes):
$ cohorte-create-node -n node1 -c hello-app
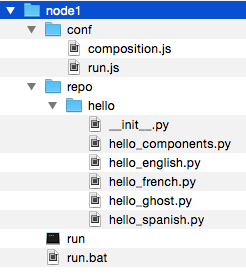
This command will create a new directory named node1 containing an executable run (which launches the created COHORTE node) and two folders conf (containing configuration files) and repo (where user bundles should be placed).
- Download the first bundle of this tutorial containing the implementation of the specified components in Python.
- Extract the downloaded zip file and put the extracted
hellodirectory innode1/repo.
Preparing the deployment plan (composition)
In order to have this deployment plan corresponding to the resilient architecture detailed before, you should edit the node1/conf/composition.js file to specify the set of components that will be instantiated on each isolate.
{
	"name": "hello-app",
	"root": {
		"name": "hello-app-composition",
		"components": [
			{
				"name"    : "HC",
				"factory" : "hello_components_factory",
				"isolate" : "web",
				"node"    : "node1"
			}, {
				"name"    : "EN",
				"factory" : "hello_english_factory",
				"isolate" : "components-1",
				"node"    : "node1"
			}, {
				"name"    : "FR",
				"factory" : "hello_french_factory",
				"isolate" : "components-1",
				"node"    : "node1"
			}, {
				"name"    : "ES",
				"factory" : "hello_spanish_factory",
				"isolate" : "components-1",
				"node"    : "node1"
			}
		]
	}
}
It’s done! all what’s you need to do now is starting node1 to launch your application.
Starting the node
Change your working directory to node1 and type :
$ ./run --app-id step1 --top-composer true --http-port 8080
The --app-id argument is required for each COHORTE node. If you have more than one node (as we will see further), all the nodes should be started with the same APP ID. The --top-composer option is set to true which means that this node is started as a Top Composer. The Top Composer is responsable for calculating the distribution of the application components (using conf/composition.js) and ordering the different nodes and by then isolates to instantiate components in the right place.
Testing our Hello Components application
-
Open a web browser and enter this url :
http://localhost:8080/webadmin -
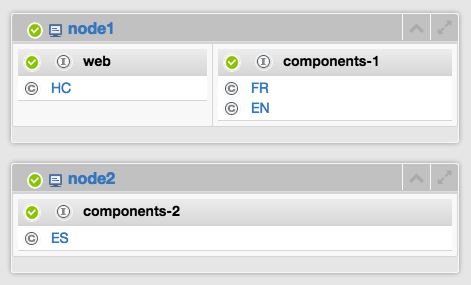
This will open the administration dashboard of the Cohorte system. It contains the list of all the nodes/isolates/components of the application. You notice that we have one Node (called node1), two Isolates (components-1 and web) containing the list of components as specified in the
conf/composition.jsfile.
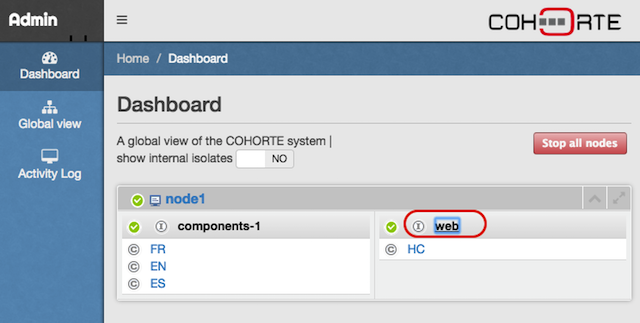
- Click on the web isolate and copy the HTTP SERVICE PORT property value.
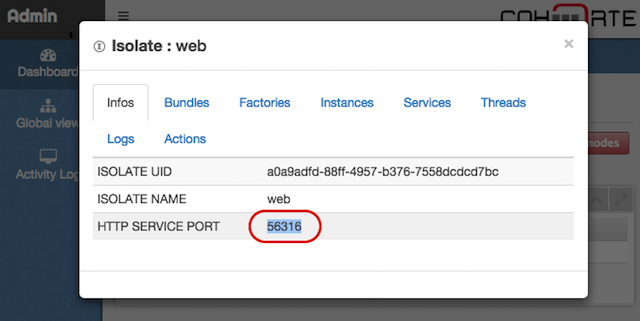
Notice that you can also retrieve the http port of the web isolate from the terminal you have used to launch the node. Type http command on the terminal to have this information.
$ http+--------------+------------------------------------+-----------+--------------------------------------+-------+ | Name | UID | Node Name | Node UID | HTTP | +==============+====================================+===========+======================================+=======+ | components-1 | 9fa3c812-64b0-499e-8b65-6ac5fe8bcf | node1 | 71c96fe6-5ce2-43c9-bafc-6f0905d8cf74 | 63625 | +--------------+------------------------------------+-----------+--------------------------------------+-------+ | web | ac0dd576-a7fb-4c34-b7ab-b68a810c38 | node1 | 71c96fe6-5ce2-43c9-bafc-6f0905d8cf74 | 56316 | +--------------+------------------------------------+-----------+--------------------------------------+-------+
- Open a new browser page and access the servlet of this isolate :
http://localhost:<copied_port>/
It’s time to play with yout distributed Cohorte application :)
If you did not succeed to construct your first node, you can download it from here.
To stop COHORTE (all running nodes), type shutdown command on the terminal, or click on Stop all nodes on Web Admin.
Distributing the application (two nodes)
In this second step, we will distribute our components among two nodes (which can be physically located on a local network area - or on Internet).
We move the ES Component to this new second node.
Here is the new depoyment configuration (composition) for this case.
Preparing the second execution node
Start first by creating a second COHORTE node named node2 at the parent level.
$ cohorte-create-node --name node2
Then, copy the same hello bundle located on node1/repo into node2/repo directory.
In future versions, you will not copy your bundles manually into the repo directory of the participating nodes. This will be done automatically using an internal provisioning module.
We will then update our composition file to fit this new situation.
Updating the composition file
Ensure to have stopped the previous execution and update the composition.js file located on node1/conf as follow :
{
	"name": "hello-app",
	"root": {
		"name": "hello-app-composition",
		"components": [
			{
				"name"    : "HC",
				"factory" : "hello_components_factory",
				"isolate" : "web",
				"node"    : "node1"
			}, {
				"name"    : "EN",
				"factory" : "hello_english_factory",
				"isolate" : "components-1",
				"node"    : "node1"
			}, {
				"name"    : "FR",
				"factory" : "hello_french_factory",
				"isolate" : "components-1",
				"node"    : "node1"
			}, {
				"name"    : "ES",
				"factory" : "hello_spanish_factory",
				"isolate" : "components-2",
				"node"    : "node2"
			}
		]
	}
}ES component is specified to be in another isolate (named "components-2") rather than "components-1" isolate containing the first components. In the actual version of COHORTE you can not have two different isolates with the same name in two different nodes!
It’s done! all what’s you need to do now is starting node1 as Top composer and node2 as simple node (also called Node Composer).
Starting the nodes
node1$ ./run --app-id step2 --top-composer true
You can test this first part of the application as your HC component is instantiated in this node (on web isolate). Follow the same steps as in the first part of this tutorial to find the http port and to launch the web interface. You notice that there is only two components FR and EN. This is because ES component is specified to be instantiated on node2 which is not yet started.
In a separate terminal, start node2 as follow :
node2$ ./run --app-id step2
Refresh the webpage provided by HC Component. You will notice that ES component is detected and used by the HC component even if it was deployed in a separate remote node.
Try also to stop the second node node2 (type quit on its terminal window, or using Web Admin interface by clicking on the node’s name, and then Stop button). Refresh the web interface, you will notice the departure of ES component.
If you did not succeed to complete the second step, you can download it from here.
Using heterogeneous components (Java and Python)
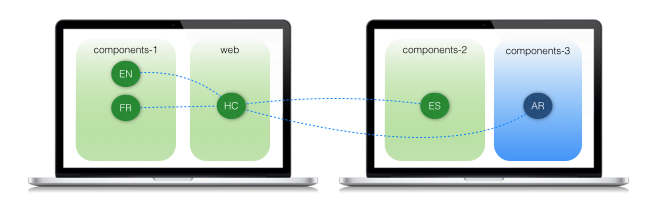
All the components used until now are implemented in Python. We will extend our application by introducing a new component that implements the HELLO SERVICE in Java (HelloArabic - AR).
- Stop the running nodes of the previous step (use
shutdowncommand - or stop node seperatly usingquitcommand on each one). - Donwload the bundle (jar file) containing the implementation code of the AR component.
- Put the downloaded file
hello-java.jarintonode2/repodirectory. - Update the
composition.jsfile located onnode1/confto add this new AR. It should be instantiated onnode2within an isolate namedcomponents-3.
{
	"name": "hello-app",
	"root": {
		"name": "hello-app-composition",
		"components": [
			{
				"name"    : "HC",
				"factory" : "hello_components_factory",
				"isolate" : "web",
				"node"    : "node1"
			}, {
				"name"    : "EN",
				"factory" : "hello_english_factory",
				"isolate" : "components-1",
				"node"    : "node1"
			}, {
				"name"    : "FR",
				"factory" : "hello_french_factory",
				"isolate" : "components-1",
				"node"    : "node1"
			}, {
				"name"    : "ES",
				"factory" : "hello_spanish_factory",
				"isolate" : "components-2",
				"node"    : "node2"
			}, {
				"name"    : "AR",
				"factory" : "hello_arabic_factory",
				"isolate" : "components-3",
				"node"    : "node2"
			}
		]
	}
}
Starting the nodes
Start the first node with one more argument --interpreter set to Python 3 interpreter command.
node1$ ./run --app-id step3 --top-composer true --interpreter python3
This is because Java isolates needs Python 3 to work property (internal Cohorte’s dependency).
Start the second node as done before :
node2$ ./run --app-id step3 --interpreter python3
Ensure to have Python 3.4 installed on your system. If Python 2 is also installed in the same machine, you should specify python3 as interpreter when starting COHORTE nodes.
You will notice that AR component is used by HC component like other Python component!
If you did not succeed to complete this third step, you can download it from here.
crash-test!
We introduce a new component Ghost which has a faulty say_hello method implementation.
Cohorte manages the dynamic isolation of components on different isolates. If one component fails and brokes down the runtime container, Cohorte sperates all the components to different dynamically created isolates.
Composition file :
We should force one component to be in a specific isolat only if we are sure that is safe. Otherwise, we should not provide a specific isolate name in the composition specification and let Cohorte manages all the components and isolats on your behalf. In our case, the only considered safe component is HC.
For test purposes, we put Ghost component on node1.
{
	"name": "hello-app",
	"root": {
		"name": "hello-app-composition",
		"components": [
			{
				"name"    : "HC",
				"factory" : "hello_components_factory",
				"isolate" : "web",
				"node"    : "node1"
			}, {
				"name"    : "EN",
				"factory" : "hello_english_factory",
				"node"    : "node1"
			}, {
				"name"    : "FR",
				"factory" : "hello_french_factory",
				"node"    : "node1"
			}, {
				"name"    : "ES",
				"factory" : "hello_spanish_factory",
				"node"    : "node2"
			}, {
				"name"    : "AR",
				"factory" : "hello_arabic_factory",
				"node"    : "node2"
			}, {
				"name"    : "Ghost",
				"factory" : "hello_ghost_factory",
				"node"    : "node1"
			}
		]
	}
}
Initial runtime composition :
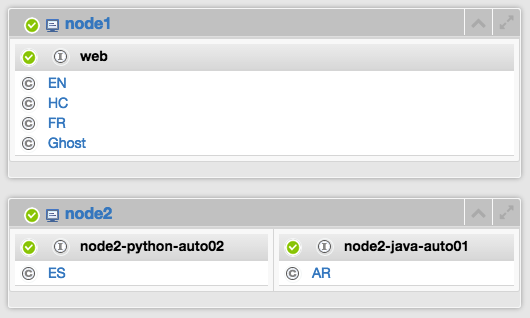
Cohorte putted all the components of node1 on one isolate web. Initialy it considers that all of them are safe.
On node2 it creates two isolates as we have to different component runtimes (Java and Python).
To causes a crash :
- Open the HC webpage and click on the Ghost component’s say_hello link.
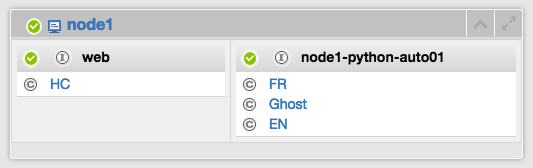
First crash :
Node2 is not affected, it is not showed hereafter.
as first solution, Cohorte puts HC component on its seperate defined isolate web. The other components are moved to a newly created isolate. Cohorte tries always to have the minimum number of isolates at one time.
After a second crash :
Notice that the initial web isolate was crashed, we have now a new web isolate with the same name (you can check its UID). Open again the webpage of HC component, and click again on the Ghost component.
You have now this new composition :
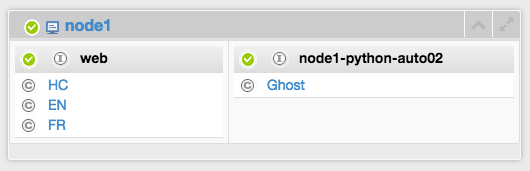
The component Ghost source of problems is isolated from other safe components.
We can fixe the *web* isolate configuration to not have a different HTTP port each time the *web* isolate is created. To do that, add the following configuration file (web.js) to your node1/conf directory.
`web.js`
{
	"composition" : [ {
		/*
		 * Override the HTTP service configuration
		 */
		"name" : "pelix-http-service",
		"properties" : {
			"pelix.http.port" : 9500
		}
	} ]
}
The nodes of this last step 4 are available here :
comments powered by Disqus