The objective of this demonstration is to show you how to control an Arduino UNO using COHORTE. In particular, we will export the functionality provided by the Arduino as a Service and then use this service as a representative component of the Arduino. This avoid as to implement low level routines to control the Arduino and allow a seamless integration with other application components (using remote services).
You can download the provided COHORTE node using the following link :
Application
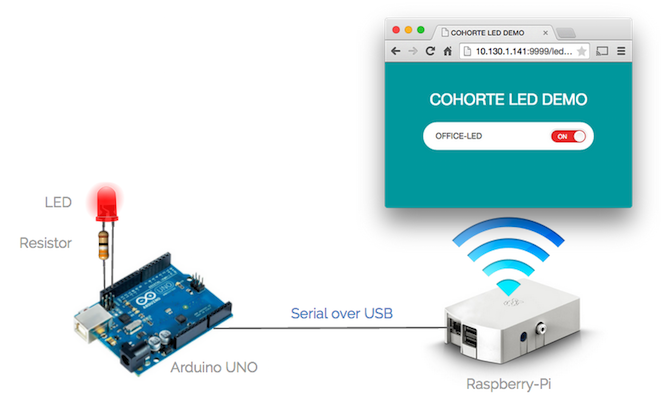
Architecture

Code
Arduino code
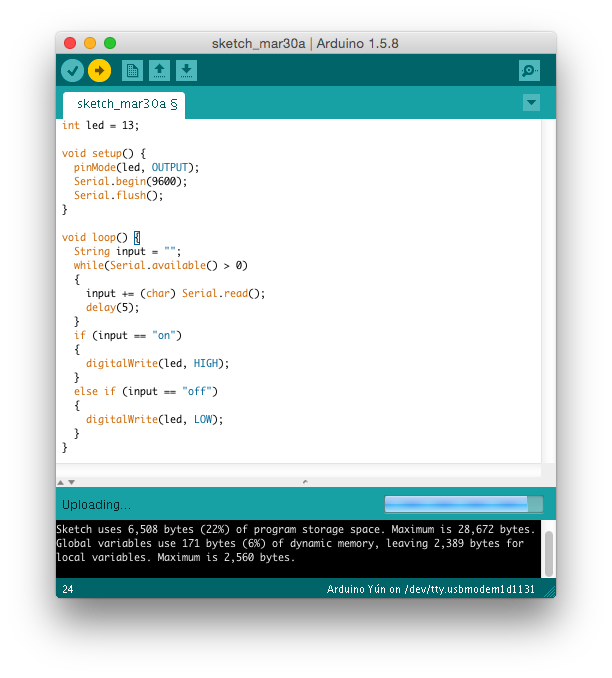
Open Arduino Studio and past the following code.
int led = 13;

void setup() {
  pinMode(led, OUTPUT);
  Serial.begin(9600);
  Serial.flush();
}

void loop() {
  String input = "";
  while(Serial.available() > 0)
  {
    input += (char) Serial.read();
    delay(5);
  }
  if (input == "on")
  {
    digitalWrite(led, HIGH);
  }
  else if (input == "off")
  {
    digitalWrite(led, LOW);
  }
}
Connect the Arduino UNO with your computer, and choose the right port in the menu :
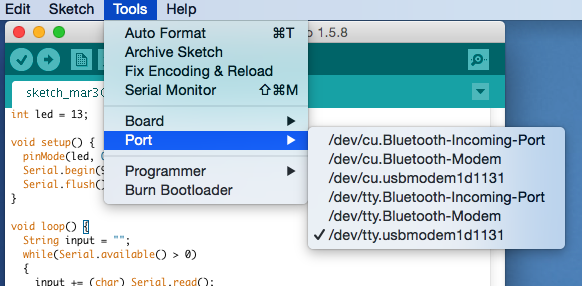
Compile and send the code to the Arduino UNO :
Raspberry code
The downloaded demo bundle contains the following files :
repo/led_uno_wrapper/led_uno_wrapper.py
from pelix.ipopo.decorators import ComponentFactory, Provides, Validate, Invalidate, Property
from pelix.ipopo import constants

import serial

@ComponentFactory("led_uno_wrapper_factory")
@Property("_name", "led.name", constants.IPOPO_INSTANCE_NAME)
@Property("_serial_port", "serial.port", '/dev/tty.usbmodem1d1131')
@Provides("java:/led.services.LedService")
class LedUnoWrapper(object):

    def __init__(self):
        self._name = "led"
        self._state = "off"
        self._serial_port = None
        self._serial = None

    @Validate
    def start(self, context):
        self._serial = serial.Serial(self._serial_port, 9600, timeout=5)
        #self.on()

    @Invalidate
    def stop(self, context):
        self._serial.close()
        self._serial = None
        #self.off()

    def get_name(self):
        return self._name

    def get_state(self):
        return self._state

    def on(self):
        if self._serial.isOpen():
            self._serial.write("on")
            self._state = "on"

    def off(self):
        if self._serial.isOpen():
            self._serial.write("off")
            self._state = "off"

    # Java API compliance
    getName = get_name
    getState = get_state
The concrete port used by your Arduino is provided as component proprty (see composition file).
repo/web_viewer/viewer.py
from pelix.ipopo.decorators import ComponentFactory, Provides, Requires, Property
import pelix.remote
import os
import json


@ComponentFactory("led_viewer_factory")
@Provides('pelix.http.servlet')
@Requires("_leds", "java:/led.services.LedService", optional=True, aggregate=True)
@Property('_path', 'pelix.http.path', "/leds")
@Property('_reject', pelix.remote.PROP_EXPORT_REJECT, ['pelix.http.servlet'])
class Viewer(object):

    def __init__(self):
        self._path = None
        self._leds = []
        self._leds_map = {}

    def get_led(self, led):
        result = {}
        if led in self._leds_map:
            result["name"] = led
            state = self._leds_map[led]["svc"].get_state()
            result["state"] = state
            return result
        else:
            return {"name": "unknown", "state": "unknown"}

    def get_leds(self):
        result = {"leds": []}
        for led in self._leds_map:
            state = self._leds_map[led]["svc"].get_state()
            result["leds"].append({"name": led, "state": state})
        return result

    def send_action(self, led, action):
        result = {}
        _led = self._leds_map[led]
        if _led:
            result["name"] = led
            if action == "on":
                self._leds_map[led]["svc"].on()
                result["state"] = "on"
            elif action == "off":
                self._leds_map[led]["svc"].off()
                result["state"] = "off"
        return result

    # we have omitted the remaining code handling HTTP requests for clarity
conf/composition.js
Update the “serial.port” propery and put the concret serial over usb port used between the raspberry and the arduino UNO.
{
    "name": "raspberry-app",
    "root": {
        "name": "raspberry-app-composition",
        "components": [
            {
                "name" : "led-uno-wrapper",
                "factory" : "led_uno_wrapper_factory",
                "properties" : {
                    "led.name" : "my-led",
                    "serial.port" : "/dev/ttyACM0"
                },
                "isolate" : "devices"
            },
            {
                "name" : "led-viewer",
                "factory" : "led_viewer_factory",
                "isolate" : "ui"
            }
        ]
    }
}
Running
-
Connect the Arduino UNO with the Raspberry.
-
Ensure to have COHORTE installed in your Raspberry system (choose Python-distribution from the download page).
-
Go to
led-gatewayfolder of the downloaded zip file and launch COHORTE node:
$ ./run
- Open a web browser with the following address:
http://localhost:9000/admin
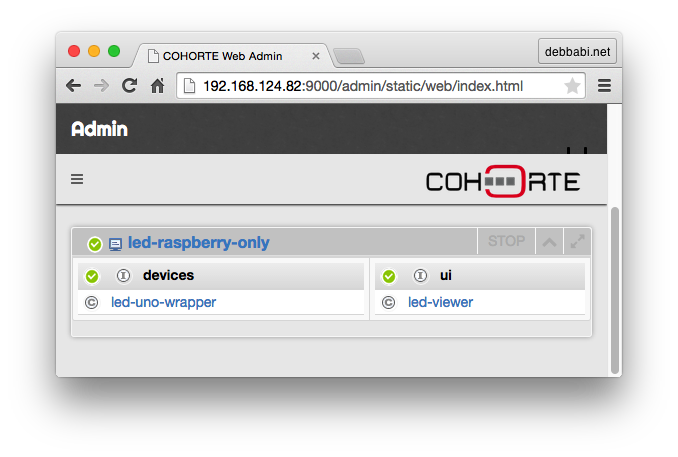
- Click on the
app-isolateisolate which contains theled-viewercomponent, and then click on the HTTP SERVICE link on the showed modal window. This will open the http server page of this isolate on which a list of the published servlets is showed. Ckick on/ledslink to access theled-viewerpage. Viewer web page :
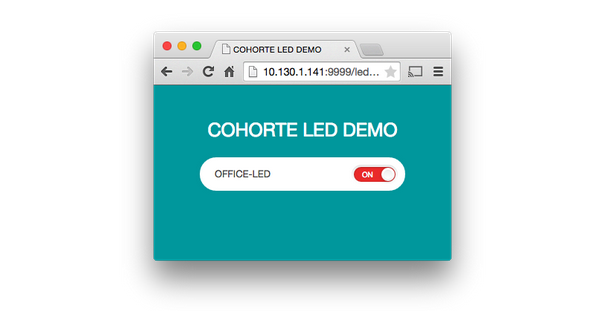
You can control now the LED of the Arduino using the ON/OFF button of the web interface.
Final remarks
- You can give a static url path to your viewer’s container so that you can access it using your web mobile browser without retyping the url each time.
- We can deploy the viewer anywhere we want. If your deployment infrastructure is limited to a local network area, you can start COHORTE in HTTP mode.
- You can add an intermediate component that controls a set of LEDs (or Arduinos). This depends on your needs for one specific scenario. Thanks to COHORTE your Arduino is seen as a service which can be consumed locally or remotely with no supplemental efforts.
comments powered by Disqus